
Home Studio Recording Setup Guide: Environment Part 3
- Dec 15, 2025
- 8 min read
Updated: Jan 17
Other Real-Life Examples
Welcome back, again!
This post continues from Part 2: Environment - 3 Stages of Home Studio Setup, where after covering the basics of improving recording environment, I shared my own home studio setup journey in detail. If you haven’t read it yet, I recommend checking that out first.
In this post, I’ll share even more real-life home studio examples, courtesy of voice actors Su Ling and Azman Zulkiply, as well as 2 of my students, to show how different voice talents approach their recording environments.
Su Ling’s Home Studio Setup
If you don’t already know, Su Ling is one of the biggest names in voice acting in Malaysia. She started doing voice-overs in 1999 when she was in her teens and currently specialises in animation and video games, and has voiced characters in Honkai: Star Rail (Bailu), Honor of Kings (Umbrossa), Path to Nowhere (Cabernet), Mobile Legends (Nana), No Straight Roads (Mayday), Ejen Ali (Elle), and BoBoiBoy (Ying), just to name a few.
I first met Su Ling through the audio drama Y2K, where we both played Malaysian characters with her as my older sister. We’ve also worked on Vast Horizon and another audio drama where she voiced my mother. I have so many good things to say about Su Ling, but then this post would be too long. So! Let’s check out her home studio setup :)
Stage 1: The Makeshift Phase (2020)
During the pandemic, Su Ling was stuck at home due to Malaysia’s strict movement restrictions, so she decided to go online and audition for voice projects. Su Ling did her auditions in an open room that echoed really badly with a USB mic and nothing else. She got cast in nothing, including unpaid projects, even though at that point she already had No Straight Roads, Boboiboy and a ton of other local Malaysian projects under her belt.
Those 6 months really took a great hit to her ego.
Stage 2: The Midway Upgrade (late 2020)
It took a great hit to my ego but then I book something within 2 weeks of setting my PVC booth up 🤣 so it was an issue of sound quality and not my skills. - Su Ling
In late 2020, Su Ling bought PVC pipes from her local hardware store and moving blankets from Taobao. It cost roughly RM550 then. You can read the process in detail here, it includes dimensions and where she got her materials from. Within 2 weeks, she booked Eximius: Seize the Frontline from an open casting call on the Voice Acting Discord server.


In a room on ground floor, Su Ling sectioned off a space with her table and built the booth frame using PVC pipes. She draped thick moving blankets on the sides and a spare Ikea blanket over the top, then secured them with heavy-duty metal clamps. Inside, she placed acoustic foams at the same height as her RODE NT1-USB mic, which was held up with a table mic stand. In this booth, she worked on video games like Ghost Song, Chinatown Detective Agency, NeuroNet: Mendax Proxy, The Captain is Dead, and others. This was also where she dubbed her first anime in English (Kageki Shojo!).
Stage 3: The Boss Level (late 2021)

At some point, Su Ling upgraded her setup too. She removed the built-in table and bought this freezer-like booth from Taobao (I’d share the link but it no longer exists).
That cost roughly RM4.7K during the 11.11 sale + RM2K for shipping (it was 800kg). It was shipped to her home in pieces, and she hired 4 handymen for RM300 to remove it from the lorry and assemble it in her room, totalling RM7K.
The booth came with built-in lighting and some ventilation, though it gets stuffy once the door is closed. The interior was completely bare, so she added acoustic panels and huge bass traps, and switched to a desk-mounted boom arm for her Blue Baby Bottle mic. This totalled to around RM2.5K.


For RM4.5K, Su Ling replaced all 4 window panels behind the booth with double-glazed German windows that allow light to enter but cannot be opened. These windows, together with her booth, were quite the game-changer. She once told me she had a live-directed session during Chinese New Year with fireworks going off outside, but once she went into her booth and shut the doors, the clients heard absolutely nothing.

This is her latest setup; she fixed a ceiling-mounted mic stand, installed dual-monitors, removed the clunky bass traps and replaced them with acoustic panels instead. There’s also some nice fluffy carpet underneath.
Check out an interview with Su Ling, where she shares some deets on her home studio setup.
Azman Zulkiply’s Home Studio Setup
Azman is another well-known figure in Malaysia’s voice-over industry, with over 10 years of experience primarily in commercials and animations. He has lent his voice to popular local animations like Ejen Ali, BoBoiBoy, Rimba Racer, and video games such as No Straight Roads and Wo Long: Fallen Dynasty.
Azman is also a skilled voice director. He guided me through dubbing a major role in an animation project that isn’t out yet. I can’t share details for now, but the character had the second-highest line count. It made the job both exciting and a little daunting because that was only my third time dubbing (the first was just a few lines, and the second was a short 3-minute backstory for Ying in Honor of Kings), but Azman was a pro and his thoughtful check-ins made the entire process encouraging and reassuring.
Right! On to his setup:
Stage 1: The Makeshift Phase + Stage 2: The Midway Upgrade
My very first version was a closet setup with probably a messy blanket over your head thing. Then I used an actual wardrobe, took out the insides and replaced it with foam. Then it's a walk-in wardrobe before the one in Subang. - Azman
His very first acoustic foams were from mudah.my, where someone was selling foam leftovers from a karaoke place, before switching to foams and panels from Begins Acoustic.
Stage 3: The Boss Level
Then Azman moved to his condo in Subang Jaya and transformed an entire room into a recording and voice-directing space. He placed bass traps in the corners and along where the walls meet the ceiling, and added acoustic foams on the ceiling to tame reflections.


On one wall, he added a grey acoustic panel, while an open wooden cabinet sits behind his workspace. He also laid down some carpets on the floor. You can hire someone (like Kenix from Begins Acoustic) to come and check out your space and teach you where to place what, but Azman figured out the placements himself. All these cost around or under RM2K.
Funny enough, I’ve been to his home studio twice for the aforementioned secret project, but I never realized there was a window behind the mic haha. He said it’s a window overlooking the outside corridor. He had it covered with blinds most of the time and never put any foam there.

Here’s a different angle of the home studio, showing his cabinet filled with books, files, and figurines. I recorded our dubbing session, and this was the moment Azman asked how I was feeling so far, and I went, “hmm…”. Look at how concerned he looked 🤣 but that's how you know he really cares.

Finally, here’s Azman in full work mode, juggling three screens with the help of coffee. It’s worth noting he records using a shotgun mic, specifically the Sennheiser MKH 416, which costs around RM4.5K. The price is justified by the fact that this mic is pretty forgiving if your space isn’t perfectly acoustically treated.
Very recently, Azman moved again and is currently living within walking distance to his new and fully equipped recording studio — Vibes & Variables.


This new studio is located at Tamarind Square, Cyberjaya, where he also shares it with two other music composers who have their respective studios. Check them out on Instagram at @vibes.variables.
Other Voice Actors’ Home Studio Setup
I have a few students who are taking voice acting more seriously these days, and here are some examples of their setups.
Joshua
Joshua is a university student in his late teens. He comes across as quiet and always-smiling when chatting normally, but when it comes to emotional lines, he can go all out. So I’m glad he’s carved out a dedicated recording space in a room upstairs that is mainly used for storage.


He hangs a thick blanket over a towel rack on wheels and places the booth structure on the bed, with about ¼ of it hanging off the edge. Then, he sits on the floor on a cushion, pulls the towel rack right behind him, and records from there. I have heard his raw audio, and even with him projecting loudly, it sounds pretty good.

For his next upgrade, I’d recommend placing the booth on a height-adjustable table so he can either sit comfortably in a chair or stand up when lots of body movement is required, and adjusting the towel rack to be tall enough to cover the full height behind him. The table will allow him to use a mic boom arm that clamps on the table and have a proper space to edit his files.
Joshua bought this green booth structure from Begins Acoustic based on my recommendation, but they’ve stopped producing it. Kenix mentioned they’re working on a different version, so I’ll keep an eye out for that.
Nico
Nico is also currently in university. I’m equally glad they’ve put in the effort to improve their recording setup, especially since they’re talented and have already booked a few roles. Nico took a different approach by focusing mainly on treating the immediate surroundings of the microphone.
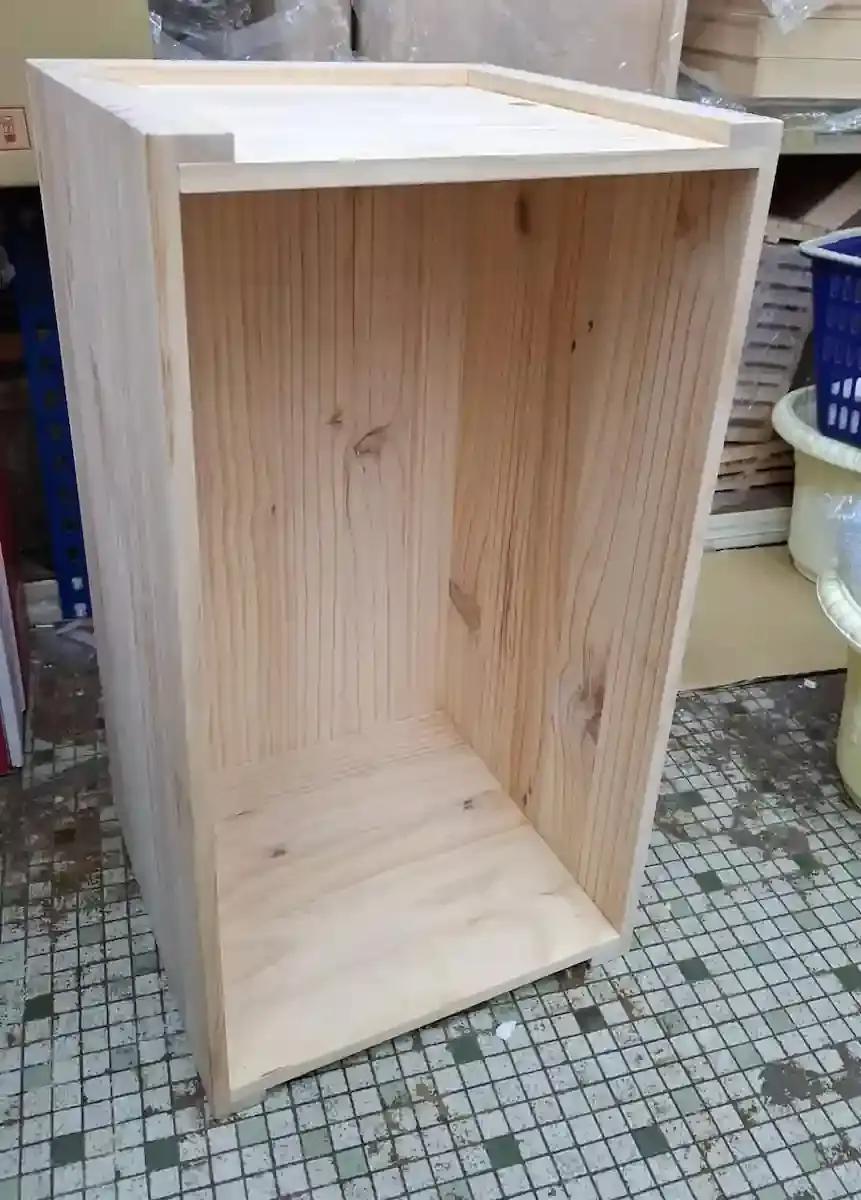

They found a seller on Shopee who customizes wooden boxes, and using 3M adhesive spray, glue the inside with a combination of acoustic and insulation foam.
Nico also shared that it’s important to confirm the internal vs. external dimensions of the wooden box before ordering. The wood itself is 12mm thick, so the usable internal space will be smaller. Using theirs as an example:
Mic Stand: 15cm (L) x 15cm (W) x 42cm (H)
External Box Dimensions: 35cm (L) x 33.8cm (W) x 65cm (H)
And here’s the cost breakdown from their total of RM235.99:
Adhesive spray + acoustic foam + insulation foam: RM110.89
Box + shipping: RM105 + RM20.10 = RM125.10
I haven’t heard the raw audio myself, but Nico mentioned that there’s been an improvement. I imagine they’d still drape a blanket over themselves and the setup when recording louder lines.
For their next upgrade, I’d recommend expanding the acoustic treatment around them—similar to Joshua’s method of using a towel rack with a blanket—and arranging their setup so they don’t have to strain their eyes by looking sideways or rely on memorising the script.
And there you have it! Whew, that was a long blog post, but packed with essential knowledge and real-life examples to help you kickstart your home studio setup and visualise what your own space could become. If this blog taught you something new or you simply enjoyed the read, do hit the heart-shaped icon to show some love and support ^.^ And thanks to all Su Ling, Azman, Joshua, and Nico for sharing their setup photos and details with me 😀
Once again, you can use my code SAMYEOW to get 10% off on all Acoustic Panels, Bass Traps, Diffusers, Adhesive Spray, Wood Panels, and FiberAkustics on Begins Acoustic; and 5% off the Producer’s Choice acoustic blankets from their US site.
If you have any questions, feel free to leave a comment.
Till next time — well, till whenever I find time to write about software and hardware :p


Comments